The Best Fluffy Pancakes recipe you will fall in love with. Full of tips and tricks to help you make the best pancakes.
Have you ever found yourself staring at your oven during a sweltering afternoon, craving something sweet but refusing to add a single degree of heat to your kitchen? Or perhaps you’ve been tasked with bringing a “fancy” dessert to a dinner party, but your schedule is packed tighter than a jar of artisanal nut butter? We have all been there. The struggle between wanting a sophisticated, bakery-quality treat and having zero desire to deal with water baths, cracked cheesecake tops, or hours of baking is real.
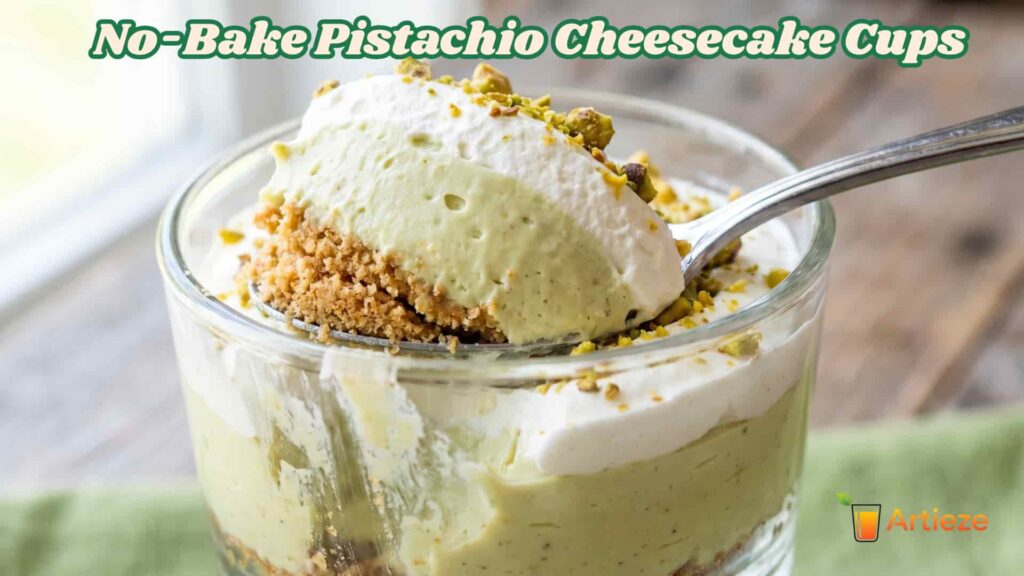
Enter the magic of the no-bake pistachio cheesecake cups. This isn’t just a shortcut; it is a culinary revelation. Imagine a buttery, salty crust topped with a cloud-like, velvety filling that tastes like pure Mediterranean luxury. These individual treats are the ultimate solution for the modern home baker. They are elegant, incredibly fast to assemble, and possess that vibrant green hue that makes them an instant showstopper. If you are looking for a quick cheesecake recipe that doesn’t compromise on flavor, stay tuned—your new favorite dessert is just a few stirs away.
Why No-Bake Pistachio Cheesecake Cups?
The shift toward no-bake desserts isn’t just a trend; it’s a lifestyle choice for the savvy host. Traditional cheesecakes are notoriously finicky. They require precise temperatures, long cooling periods, and a prayer that they don’t sink in the middle. With this no-bake dessert method, you bypass the stress entirely. By using whipped cream or heavy cream to provide structure rather than eggs and heat, you achieve a texture that is lighter, airier, and more refreshing than its baked counterparts.
But why pistachio? While strawberry and chocolate are fine, pistachio brings a certain “gourmet” edge to the table. Known as the “green gold” of the nut world, pistachios offer a complex flavor profile—earthy, slightly sweet, and intensely savory. When paired with the tang of cream cheese, the result is a sophisticated balance that isn’t cloyingly sweet.
Furthermore, serving these in individual cups is a game-changer for portion control and presentation. There is no messy slicing involved, and every guest gets their own perfect ratio of crust to filling. Whether you are hosting a summer BBQ or an upscale holiday gathering, these cups offer a level of convenience and charm that a standard cake simply cannot match.
The Ingredients You’ll Need
To achieve that professional-grade taste, the quality of your ingredients is paramount. Since we aren’t cooking these ingredients, their raw flavors will truly shine.
For the Crust:
- 1 ½ cups Graham Cracker Crumbs: Approximately 10–12 full sheets. For a twist, you can use vanilla wafers or even crushed ginger snaps.
- ¼ cup Salted Butter, Melted: The salt balances the sweetness of the filling perfectly.
- 1 tbsp Granulated Sugar: Just enough to help the crust bind and provide a slight crunch.
For the Pistachio Filling:
- 16 oz (450g) Cream Cheese: Two standard blocks. Ensure they are completely softened to room temperature.
- ½ cup Pistachio Paste or Butter: This is the secret to intense flavor. Look for 100% pure pistachio paste without added oils.
- 1 cup Powdered Sugar: Sifted to ensure a silky-smooth consistency.
- 1 tsp Pure Vanilla Extract: Enhances the nuttiness of the pistachios.
- 1 ½ cups Heavy Whipping Cream: Cold, straight from the fridge, to ensure it whips to stiff peaks.
- Optional: A drop of natural green food coloring if you want a more “neon” look, though the natural paste usually provides a beautiful sage green.
For the Topping:
- ¼ cup Roasted Pistachios: Finely chopped for a delightful crunch.
- Extra Whipped Cream: For a decorative swirl.
Equipment Needed
One of the best things about this easy pistachio dessert is that it requires no specialized “pastry chef” gear. You likely have everything you need in your cupboards right now:
- Two Large Mixing Bowls: One for the cheesecake base and one for whipping the cream.
- Electric Hand Mixer or Stand Mixer: Essential for getting that cream cheese fluffy and the cream stiff.
- Rubber Spatula: For the delicate “folding” process that keeps the filling light.
- Measuring Cups and Spoons: Precision is your friend here.
- 6 to 8 Serving Cups: You can use glass ramekins, small mason jars, or even elegant wine glasses for a transparent view of the layers.
- A Large Zip-top Bag: Useful for crushing crackers and even for piping the filling into cups.
Step-by-Step Instructions
Follow these steps closely to ensure your cheesecake cups turn out flawlessly every single time.
1. Prepare the Base
Start by transforming your graham crackers into fine crumbs. You can do this in a food processor or by placing them in a plastic bag and using a rolling pin. In a small bowl, combine the crumbs, melted butter, and sugar. Stir until the mixture resembles wet sand.
Distribute the mixture evenly among your serving cups. Use the back of a small spoon or a narrow glass to press the crumbs down firmly. This creates a solid foundation that won’t crumble the moment a spoon hits it. Place the cups in the fridge to firm up while you work on the star of the show.
2. Cream the Filling
In your main mixing bowl, beat the softened cream cheese until it is smooth and completely free of lumps. This usually takes about 2–3 minutes of high-speed mixing. Pro Tip: If your cream cheese is even slightly cold, you will end up with tiny white specks in your green filling.
Add the powdered sugar, vanilla extract, and the pistachio paste. Beat again until the mixture is uniform and vibrant. The aroma at this stage should be incredible—sweet, nutty, and rich.
3. Whip the Cream
In a separate, chilled bowl, pour in your cold heavy whipping cream. Beat on medium-high speed until stiff peaks form. Stiff peaks mean that when you lift the beaters, the cream stands straight up without drooping. Be careful not to over-beat, or you’ll end up with pistachio-scented butter!
4. The Gentle Fold
This is the most critical step for texture. Using a rubber spatula, add about one-third of the whipped cream into the cream cheese mixture. Stir it in to lighten the base. Then, add the remaining whipped cream and gently fold it in using a figure-eight motion. You want to incorporate the cream without deflating all the air you just whipped into it. This results in a mousse-like consistency that is heavenly on the tongue.
5. Assemble and Chill
Transfer the filling into a piping bag or a large plastic bag with the corner snipped off. Pipe the pistachio cream into the prepared cups over the crust. Piping is much cleaner than spooning and allows you to reach the edges without smearing the sides of the glass.
Smooth the tops with a small spatula if desired, or leave them with a rustic swirl. Place the cups in the refrigerator for at least 4 hours, though overnight is best. This chilling time is non-negotiable; it allows the fats to solidify, giving the cheesecake its “set” structure.
Tips for the Perfect No-Bake Pistachio Cheesecake Cups

Achieving the perfect consistency in a no-bake dessert can sometimes be tricky, but these expert tips will ensure success:
- Temperature Control: I cannot stress this enough—your cream cheese must be room temperature, but your heavy cream must be ice-cold. This juxtaposition is what creates the perfect emulsion and lift.
- The Paste vs. Extract Debate: While pistachio extract exists, it often tastes artificial or like maraschino cherries. For a true, authentic flavor, always opt for pistachio paste. If you can’t find it at the store, you can make your own by blending roasted, shelled pistachios in a high-powered blender until smooth.
- Avoid Runny Filling: If your filling seems too soft, it’s usually because the whipped cream wasn’t beaten to stiff enough peaks or the cream cheese was too watery. Ensure you are using full-fat brick cream cheese, not the “spreadable” kind from a tub.
- Toast Your Nuts: Before chopping the pistachios for the topping, give them a quick toast in a dry pan for 2 minutes. This releases the essential oils and significantly boosts the aroma.
Serving Suggestions and Variations
When you are ready to serve, the presentation is where you can let your creativity shine. A dollop of fresh whipped cream on top, followed by a generous sprinkle of crushed pistachios, is the classic choice. For a more decadent “Italian” feel, drizzle a bit of melted white chocolate or a swirl of honey over the top.
Flavor Twists to Try:
- The Persian Jewel: Add a half-teaspoon of ground cardamom to the filling and garnish with dried edible rose petals for an exotic, floral profile.
- Chocolate Pistachio: Use crushed Oreo cookies for the base instead of graham crackers. The dark chocolate provides a stunning visual contrast to the green filling.
- Lemon Pistachio: Add a teaspoon of fresh lemon zest to the cream cheese to brighten the flavors and cut through the richness.
These cups are also perfect for making ahead. You can prepare them up to two days in advance, making them the ultimate stress-free party dessert. Just wait to add the crunchy nut garnish until right before serving to ensure the pistachios stay crisp.
Conclusion
The beauty of the no-bake pistachio cheesecake cup lies in its contradiction: it looks and tastes like a complicated, high-end dessert, yet it requires less effort than a batch of standard brownies. By combining the earthy elegance of pistachios with the effortless technique of no-bake chilling, you’ve created a dessert that is as practical as it is delicious.
Whether you’re looking for a quick cheesecake recipe to satisfy a midweek craving or an impressive finale for a dinner party, these little green cups of joy never fail to deliver. Give this recipe a try this weekend—your taste buds (and your oven) will thank you.
How did your cheesecake cups turn out? Did you try any unique toppings? Let us know in the comments below, and don’t forget to share your photos with us on social media!
FAQs About No-Bake Pistachio Cheesecake Cups
1. How long do No-Bake Pistachio Cheesecake Cups need to set?
No-Bake Pistachio Cheesecake Cups should chill for at least 4 hours, but overnight chilling gives the best firm and creamy texture.
2. Why are my No-Bake Pistachio Cheesecake Cups too soft?
If your No-Bake Pistachio Cheesecake Cups are too soft, it’s usually due to under-whipped cream or not enough chilling time. Make sure the cream reaches soft peaks before folding.
3. Can I make No-Bake Pistachio Cheesecake Cups without pistachio paste?
Yes, you can use finely ground pistachios instead of paste, but the flavor in No-Bake Pistachio Cheesecake Cups will be slightly less intense.
4. How long do No-Bake Pistachio Cheesecake Cups last in the fridge?
No-Bake Pistachio Cheesecake Cups can be stored in the refrigerator for up to 3–4 days in an airtight container.
5. Can I freeze No-Bake Pistachio Cheesecake Cups?
Yes, No-Bake Pistachio Cheesecake Cups can be frozen for up to 1 month. Thaw them in the fridge before serving for the best texture.